Introduction
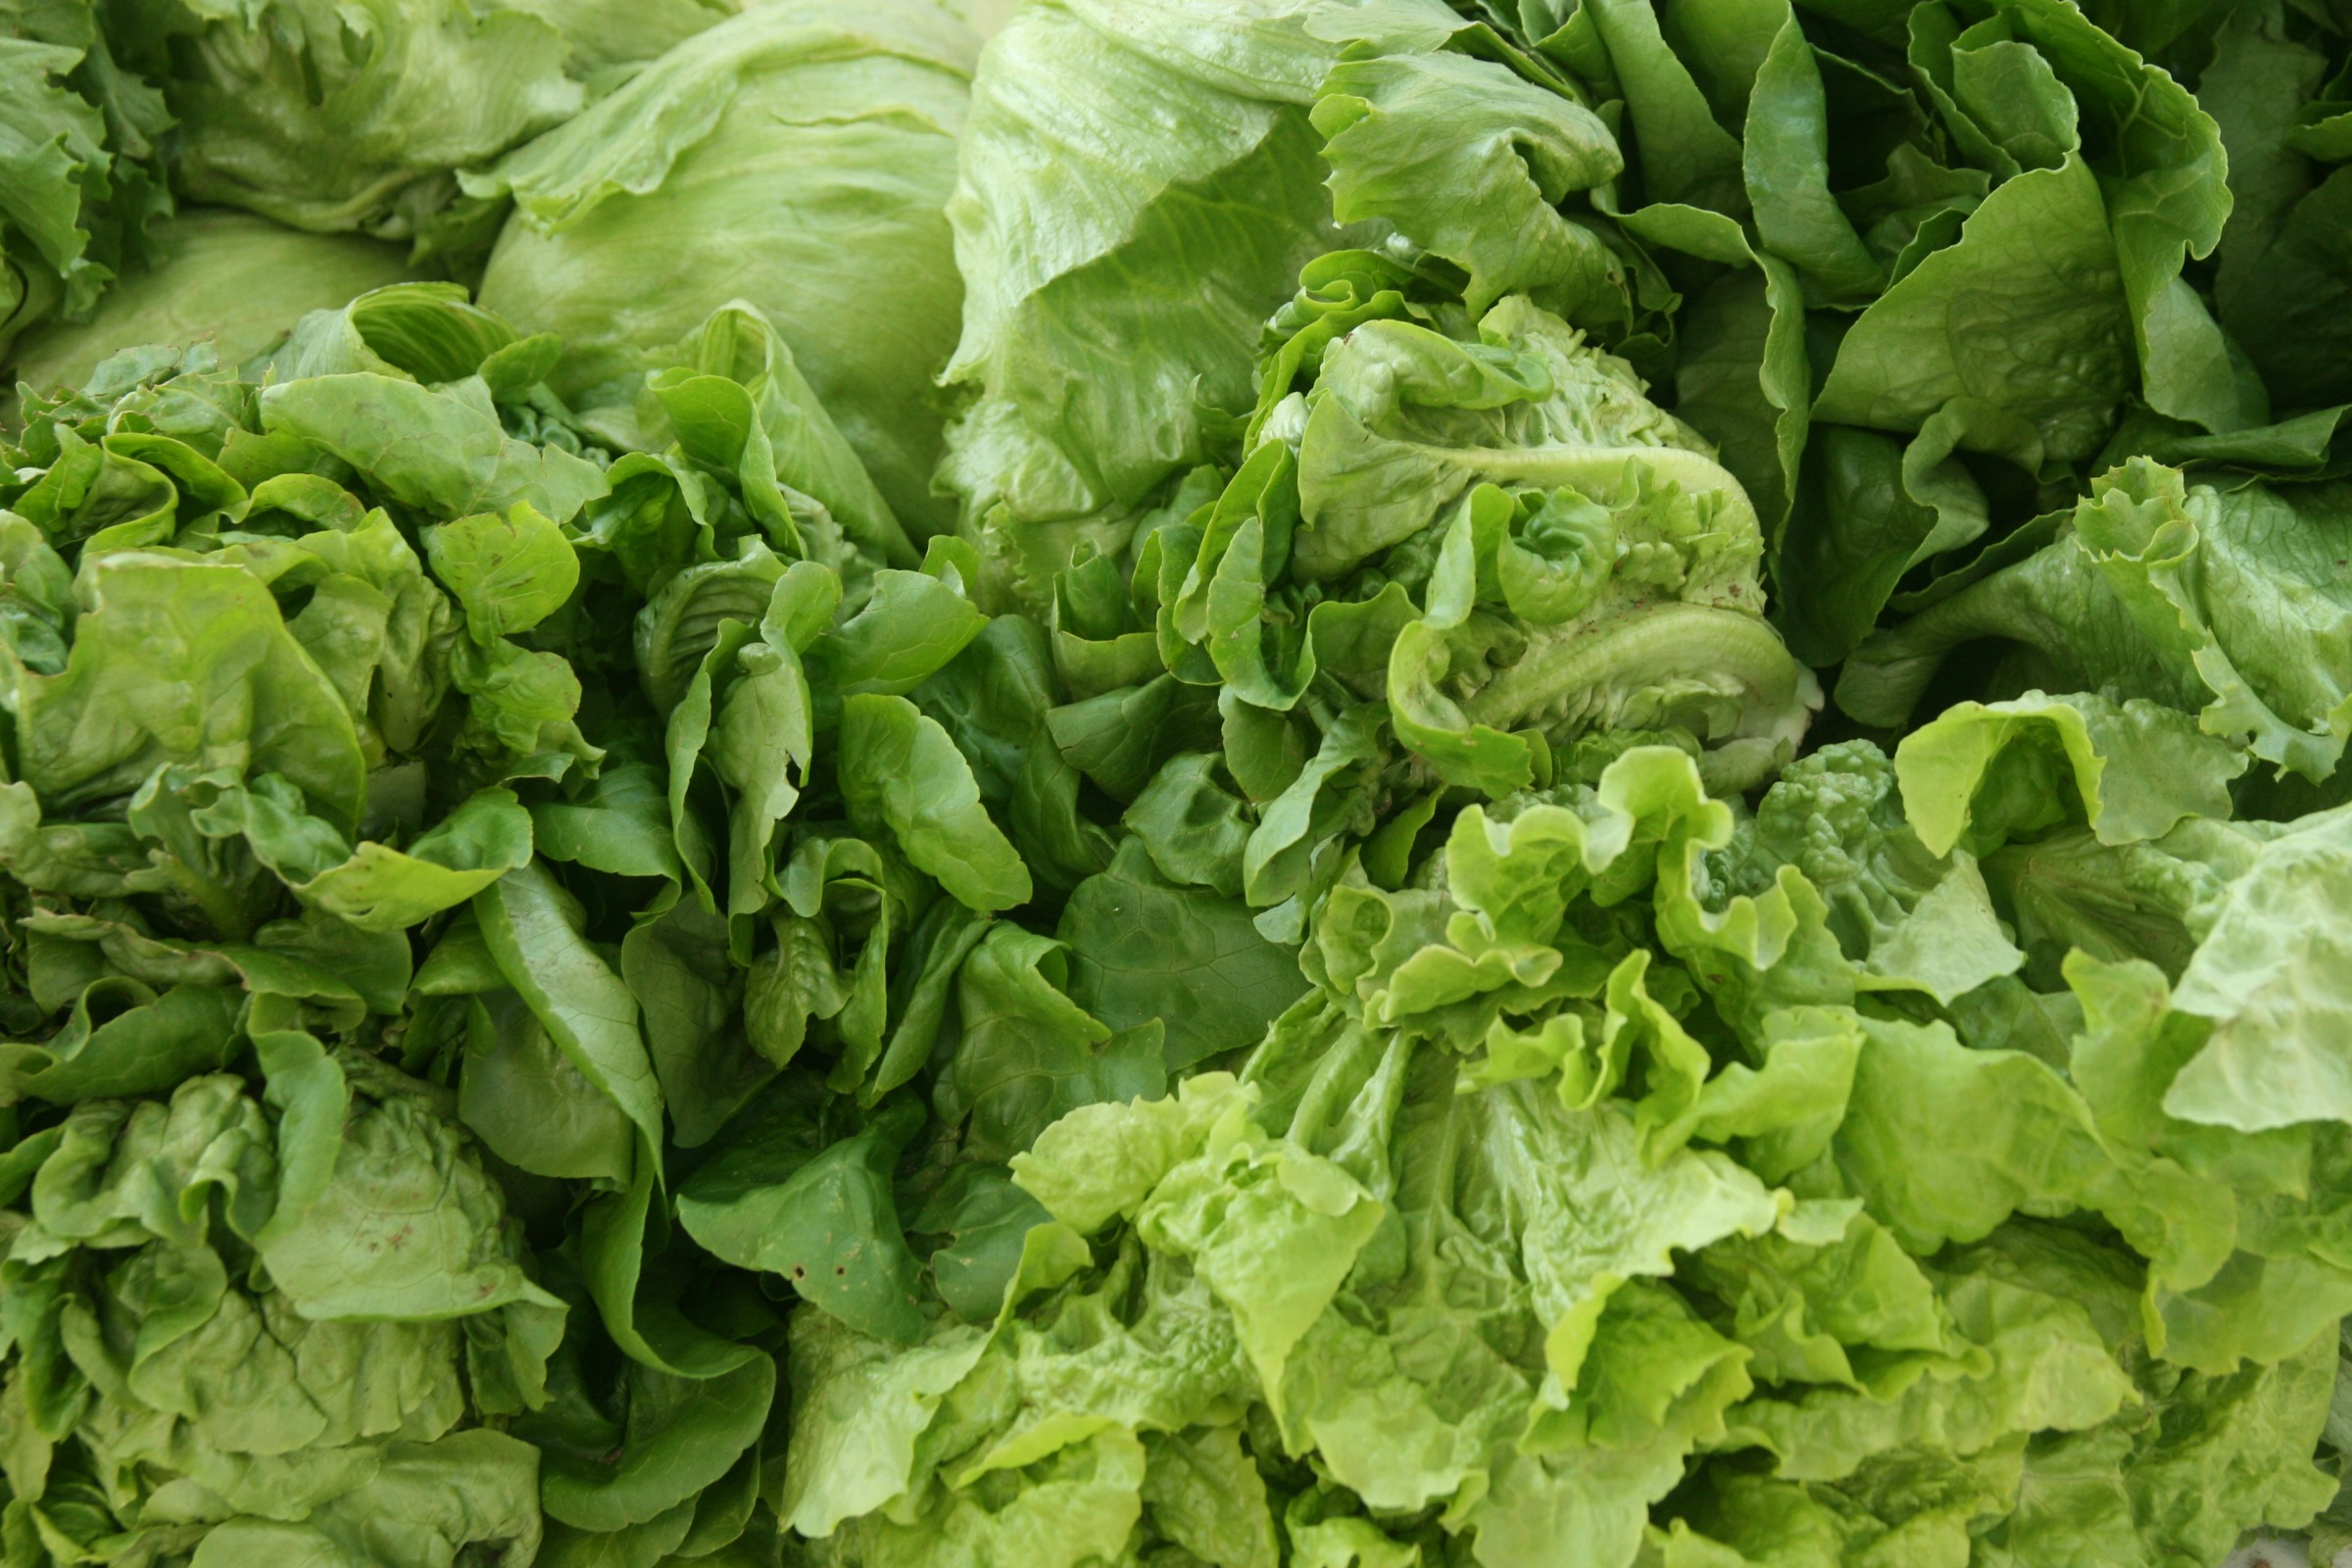
Salad greens provide market gardeners a high value crop that brings a premium price if grown and marketed successfully. Salad mixes have become particularly popular among customers seeking convenience. Salad mix is a collection of leafy greens pre-mixed and sold together. This idea originated in France centuries ago where a mix of immature “baby” greens was called “mesclun.” The greens can be grown as a mixture in the field or combined after harvest.
Because of their highly perishable nature, salad greens are better suited to local production than long distance shipping. Growers should be aware that the inputs necessary to produce a quality crop can be high and include a lot of hand labor.
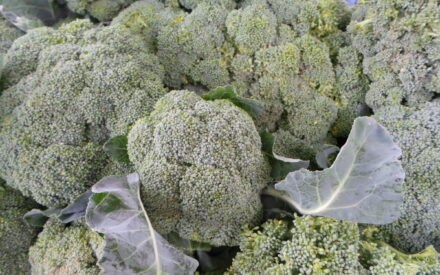
The crops discussed in this publication include four types of lettuce (crisphead, butterhead, romaine, and leaf), spinach, endive, escarole, radicchio, witloof, and Swiss chard.
Plant Descriptions
Most of the salad greens grown in Wisconsin belong to one of three plant families: Asteraceae (composite family), Brassicaceae (mustard family), or Chenopodiaceae (goosefoot family). The majority are cool-season annuals, although some varieties can tolerate summer heat. As a result of the natural growing conditions suited for salad greens, some market gardeners only offer them early in the season and again in the fall when temperatures cool down.
Lettuce
Lettuce (Lactuca sativa) is a cool-season, herbaceous annual in the Asteraceae family, native to the eastern Mediterranean and Asia Minor. Early records of lettuce cultivation have been found on Egyptian tombs dating back to 4500 B.C. Lettuce was cultivated for the medicinal properties of its milky sap and for its seed oil. Lettuce is thought to have arisen from Lactuca serriola, a widely dispersed, primitive, spiny form. The word “lettuce” is derived from lactis (Latin for “milk of plants”).
Despite the low level of vitamins and nutrients in most lettuce varieties, lettuce is considered the fourth most significant U.S. crop from a nutritional standpoint because of the large volume consumed. Lettuce contains fiber, vitamins A and C, calcium, and iron. Leaf lettuce has more nutritional value than head lettuce, and dark green leaves have more nutritional value than light colored leaves.
The different varieties of lettuce have a huge variation in leaf shape, texture, color, and overall plant form.
Spinach
Spinach (Spinacia oleracea) originated near Iran and was introduced into China via Nepal in 647 A.D., and into Spain via N. Africa in 1100 A.D. Spinach is a member of the goosefoot family, Chenopodiaceae.
The genus name Spinacia refers to the prickly seed capsule and is derived from spina which means “spiny” in Latin. This hardy, cool-season annual is an important source of vitamins A and C as well as calcium, phosphorus, iron, and potassium. Spinach is also high in fiber and relatively high in protein.
Spinach leaves are borne in a rosette with many leaves attached to a short fleshy stem. Leaves may be smooth or savoy (crinkled). Savoy types have a layer of cells that continue to grow between the leaf veins causing a puckering effect. Spinach cultivars may be upright or spreading.
Endive and Escarole
Endive (Cichorium endivia) is a hardy annual or biennial with two forms: curly and broadleaved. Endive is a member of the composite family, Asteraceae. Records of its cultivation date back to ancient Egypt. Curly endive is also known as chicorée or frisée and has narrow, lacy, deeply cut curly leaves. Broadleaved endive is called escarole and has large, crumpled, smooth-edged leaves. Both curly endive and escarole have a slightly bitter taste, although much less so than radicchio. Curly endive withstands heat better than escarole, radicchio, and witloof. Escarole is more cold tolerant than witloof or curly endive and also tolerates low light conditions, making it potentially well-suited for winter greenhouse production.
Radicchio and Witloof
Radicchio (Cichorium intybus) is native to the Mediterranean region and is a cultivar of chicory. Radicchio forms loose, small heads similar to a pointed cabbage. It typically has red leaves that are white along the midrib and near the base. The bitter leaves sweeten slightly in cooler weather. Radicchio is somewhat frost tolerant.
Witloof (Cichorium intybus) is closely related to radicchio and is a common European salad crop that can be grown in the Midwest. It is also sometimes referred to as Belgian endive or chicon. Witloof is Flemish for “white-leaf.” It does not form heads but produces a tight cluster of individual upright leaves in the second year of growth. Plants are grown in the dark to blanch the leaves so they’ll remain tender and less bitter. Witloof is eaten raw in salads and also steamed, boiled, or baked. Witloof is very perishable and does not ship easily. Since it is not commonly grown in Wisconsin, you may need to test your potential market before you plant a lot of it. Try forcing a few roots on a small scale, eating them yourself so you can describe the flavor, and then visiting potential customers with your sample product. Witloof does not contain many vitamins or nutrients.
Swiss Chard
Native to the Mediterranean region, Swiss chard (Beta vulgaris var. cicla) is a member of the Chenopodiaceae family and technically a variety of beet (Beta vulgaris). Swiss chard is grown for its large crinkled edible leaves and fleshy leaf stalks (petioles) which taste similar to spinach. It is an herbaceous biennial which is grown as an annual. Unlike most other salad greens, chard does not bolt (form a premature seed stalk) when exposed to high temperatures. Therefore, chard is often grown during the heat of summer.
Specialty Greens
Numerous crops are grown as salad greens in the Midwest. Some, such as arugula, mizuna, and dandelion, are used in small quantities to add flavor to salad mix. Others, such as New Zealand spinach and purslane, grow well in hot weather and are used to fill out summer salads, while cold-tolerant crops such as mâche, claytonia, and cress extend the growing season. For more information about these crops, consult the references at the bottom of this publication.
| Common name(s) | Scientific name |
|---|---|
| Amaranth | Amaranthus tricolor |
| Arugula | Eruca sativa |
| Cilantro | Coriandrum sativum |
| Collards | Brassica oleracea |
| Corn Salad, Lamb’s Lettuce, Mâche | Valerianella locusta |
| Cress | Lepidium sativum |
| Dandelion | Taraxacum officinale |
| Kale | Brassica oleracea and Brassica napus pabularia |
| Miner’s Lettuce, Winter Purslane, Claytonia | Claytonia perfoliata or Montia perfoliata |
| Mizuna | Brassica rapa var. japonica |
| Mustard | Brassica juncea |
| New Zealand Spinach | Tetragonia tetragonioides |
| Orache | Atriplex hortensis |
| Purslane | Portulaca oleracea |
| Sorrel | Rumex acetosa |
| Tat Soi | Brassica rapa var. narinosa |
Where to Grow Salad Greens
Because salad greens are planted early in the spring—in most cases as soon as the ground can be worked, it is important to select a site where the soil warms rapidly. Salad greens transpire a lot of water and also have shallow root systems, so soil with good moisture retention is beneficial for these crops. Adequate drainage helps prevent diseases.
Early season crops are often planted on sandy soils which warm up quickly and can be worked early. Mid- to late-season crops should be planted on heavier soils or soils with a high organic matter content so they have better moisture-holding capacity. Growing leafy crops on muck soils reduces the amount of grit caught in crinkled leaves such as those of spinach. Salad greens respond well to rich, friable soil high in organic matter. Small seeds common to salad greens cannot germinate in crusted soil.
Salad greens are especially attractive to deer. Consider using portable electric fencing to protect your crop. Consult your county Extension office for information.
Choosing the Best Cultivars for Wisconsin
There are four main types of lettuce commonly grown in the Midwest: crisphead, butterhead, romaine, and leaf. Lettuce is bred for disease resistance, leaf or head color, size, shape, texture, flavor, earliness, uniformity, and heat tolerance (resistance to bolting).
Some varieties of lettuce perform better under long day conditions while others are day-neutral and not affected by day length. Table 1a lists some recommended cultivars for Wisconsin.
Note: Cultivars of salad greens perform very differently depending on soil temperature, air temperature, and day length. Choose cultivars according to your own situation and needs. Consider what your market demands, the length of your growing season, your soil, pests, diseases, irrigation, cultivars other growers like, and cultivars you personally like. When trying a new cultivar, do not use it exclusively. Grow new trials next to old standbys so you may compare the characteristics objectively
Crisphead lettuce
Crisphead lettuce cultivars (Lactuca sativa var. capitata) are often synonymous with “iceberg” lettuce, which is the name of a cultivar. Leaves are large, heavy, and brittle. The outer leaves are green while the interior leaves are white or yellow. After initial rosette development, leaves begin to overlap each other and become tightly folded to form a dense head which is usually more than 6 inches in diameter.
Butterhead lettuce
Butterhead lettuce cultivars also belong to L. sativa var. capitata, but the heads are smaller and more compact, the leaves are loosely crumpled and have less prominent veins and midribs, and the lettuce has more flavor and a buttery texture compared to crisphead lettuce. There are two distinct types of butterhead lettuce: Boston—a day-neutral cultivar which produces large heads with light green leaves, and bibb—a smaller, dark green, short-day cultivar. Bibb lettuces do not travel well since their leaves bruise and tear easily, so these types are well suited to local production. A third type, Batavia, has characteristics that are intermediate between Boston and bibb.
Romaine
Romaine, also known as cos (Lactuca sativa var. longifolia), produces elongated upright heads with long leaves that have prominent midribs. Romaine lettuce has coarse outer leaves and tender, flavorful inner leaves. It is more tolerant of adverse environmental conditions such as temperature and moisture extremes than crisphead and butterhead lettuce.
Leaf lettuce
Leaf lettuce (Lactuca sativa var. crispa) cultivars come in all types of shapes, colors, and textures. They are particularly well suited to local production since they do not ship well and would otherwise not be available commercially from other states. When selecting cultivars for salad mix, keep in mind that frequent dense plantings are required, so you will need a lot of seed. Since seed prices vary, you may wish to grow the more expensive varieties for mature heads or leaves and use less-expensive varieties for salad mix.
Spinach
Spinach cultivars are selected for their vigor, uniformity, disease resistance, nutrition, and resistance to bolting. Varieties are classified based on leaf texture: smooth or savoy (crinkled).
Endive, escarole, radicchio, and witloof
Endive, escarole, radicchio, and witloof cultivars are bred for less bitterness, resistance to tipburn, uniformity, nutrition, vigor, and appealing colors or leaf textures.
Swiss Chard
Swiss chard cultivars are bred for flavor, disease resistance, vigor, and color such as red, pink, orange, white, and yellow.
Table 1a. Recommended lettuce cultivars for Wisconsin
| Crisphead | Butterhead | Romaine | Leaf |
|---|---|---|---|
| Cardinale Crispino Great Lakes Ithaca Loma Nevada Rosa Sierra Summertime | Buttercrunch Ermosa Esmeralda Four Seasons Little Gem Nancy North Pole Pirat Summer Bibb Winter Marvel | Athena Cimmeron Deer Tongue* Freckles Giant Caesar Kalura Little Caesar Parris Island Rouge d’Hiver Rosalita Rubens Winter Density *Sometimes classified as butterhead. | Black-seeded Simpson Brunia Curly Oakleaf Grand Rapids Great Lakes Green Ice Ibis Lollo Rossa Merlot Oakleaf Prizehead Red Sails Royal Oakleaf Salad Bowl Simpson Elite Slobolt Sunset Two Star Waldmann’s |
Table 1b. Other recommended cultivars for Wisconsin
| Spinach | Radicchio | Endive | Escarole | Chard |
|---|---|---|---|---|
| Avon (savoy) Baby Leaf Giant Nobel Bloomsdale Long-Standing (savoy) Melody (savoy) New Zealand Olympia Space Tyee Viroflay Whale | Adria Carmen Chioggia Early Treviso Firebird Grumolo Inferno Palla Rossa Red Surprise Red Treviso Rossana | Bianca Riccia Frizz E Full Heart Neos Salad King Totem Très Fine | Coral Full Heart Nataly Sugarloaf | Bright Lights (multi-color) Charlotte Fordhook Giant Large White Ribbed Lucullus Monstruoso (white) Rainbow Rhubarb (red) Ruby Red (red) Vulcan (red) |
Long-Day vs. Short-Day Lettuce Cultivars
Some cultivars require long days to initiate flowering (at least 15 hours of light) while others require short days (less than 12–15 hours). “Short day” is actually a misnomer as darkness rather than day length triggers blooms. Plants that are unaffected by day length are known as day neutral.
Planting, Transplanting, and Culture
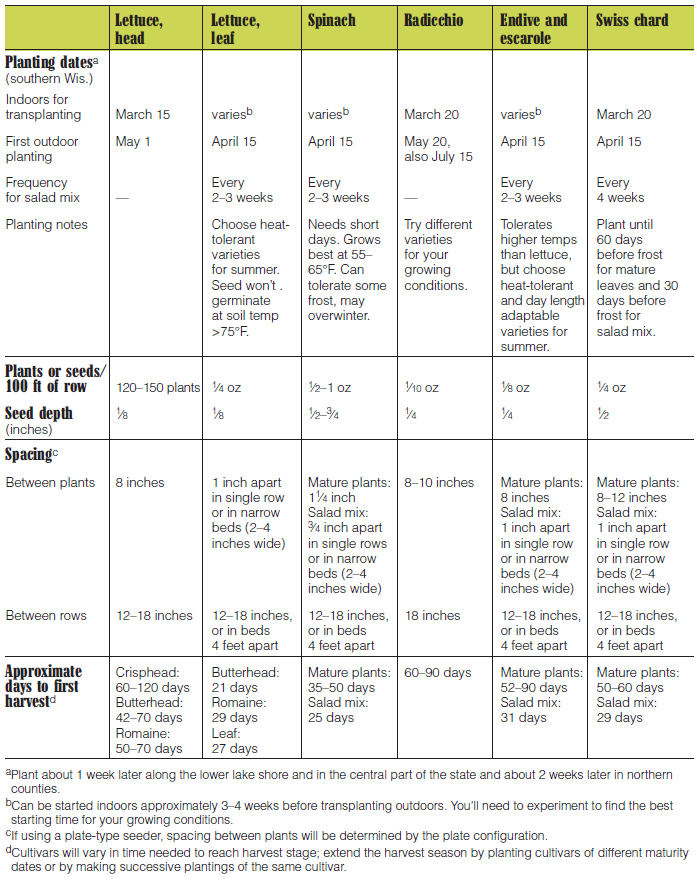
Refer to table 2 for the estimated amount of seed required, seed planting depth, yield, planting date, spacing, and days to first harvest.
Salad greens produce a marketable crop relatively quickly and are typically planted in succession so that growers can offer customers salad crops throughout the season. Sow seed as soon as possible in the spring. (Figure 1 shows approximate dates of the last spring and first fall killing frosts of the growing season.)
To help keep track of plantings during the hectic growing season, take some time in the winter to make a calendar that lists proposed yearlong planting dates. Keep in mind that the number of days to harvest for fall crops may actually be longer than that listed on the seed package because environmental conditions may slow growth. Some crops such as spinach can be overwintered, or grown under shelter such as under floating row covers, in a cold frame, or in a tunnel or hoophouse with one to two layers of clear plastic. Escarole and some other specialty crops such as claytonia, mâche, and land cress may also be grown under winter protection.
If you grow heat-sensitive leafy crops in the summer, you can try to create a cooler microclimate by shading plants with a lightweight shade cloth, which allows some light to pass through, or by planting between rows of taller crops oriented in a north to south direction. Since high soil temperatures can prevent germination, you may wish to pre-germinate seed for late-summer plantings by soaking them in water until the first root (radicle) just begins to emerge. Such seed needs to be planted by hand.
Soil Preparation
Work beds 6–7 inches deep to promote good rooting. Just before seeding, use shallow cultivation to prevent soil crusting. For early season crops on sites where erosion is negligible, prepare the site the fall before planting. Preparing the soil in the fall will prevent any planting delays caused by cold, wet soils and will help reduce soil compaction associated with working wet soils. Compacted soils restrict root growth, reduce the amount of oxygen available to roots, and limit water penetration, all of which can hurt yield potential.
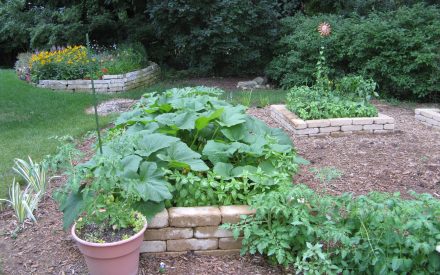
Raised Beds
Raised beds are an alternative to the conventional field planting method. They improve soil drainage and allow access to the crop without causing soil compaction. Raised beds are typically 4–5 feet wide and 100 feet long. The width is determined by the type of equipment used and by the crop. Leave a 1-foot aisle on either side of each bed to accommodate foot traffic.
Seeding
Seeds for salad crops tend to be very small. Some companies offer pelleted seeds that are coated and rolled to make them uniform and easier to handle, especially in precision seeders. Some pelleted seeds include pesticides in the coating. Precision seeding requires specialized planters and uniformly sized seeds, and prevents the need for thinning.
Specialized planters include the gravity-feed cone seeder, the belt-drive seeder, and the vacuum seeder. Walk-behind plate-type seeders are also used. Some growers who do not use precision seeders thin salad greens by hand and sell the thinnings. Prevent a crust with shallow cultivation, mulch, or by supplying enough moisture to wet the soil at germination but not to saturate it.
Starting Seeds
Salad greens can be started in the greenhouse and transplanted outdoors to get a head start on the growing season. Start your transplants 3–4 weeks before you plant them outdoors. You can buy or mix your own sterile potting mix for starting transplants. The mix should include peat, sphagnum, or compost to retain moisture; vermiculite or perlite for aeration; and mineral and nutrient sources to encourage growth after the first roots form.
Fill plastic or polystyrene cell trays with potting mix, or make individual blocks with a soil blocker. Cells as small as 1 inch in diameter are fine. Plant seeds and cover with a fine layer of media. Label transplant trays with cultivar and planting date. Keep media moist but not wet. Refer to the culture section to find the best temperature for germination. Typically the nighttime temperature should be 10–15°F cooler.
Thin seedlings to one plant per cell or plug, or one plant per inch if grown in undivided flats. Ten days before transplanting, move plants into a cold frame to harden them off, or put them outside for a few hours each day during the warmest time of the day.
Figure 1. Approximate dates for first and last killing frosts
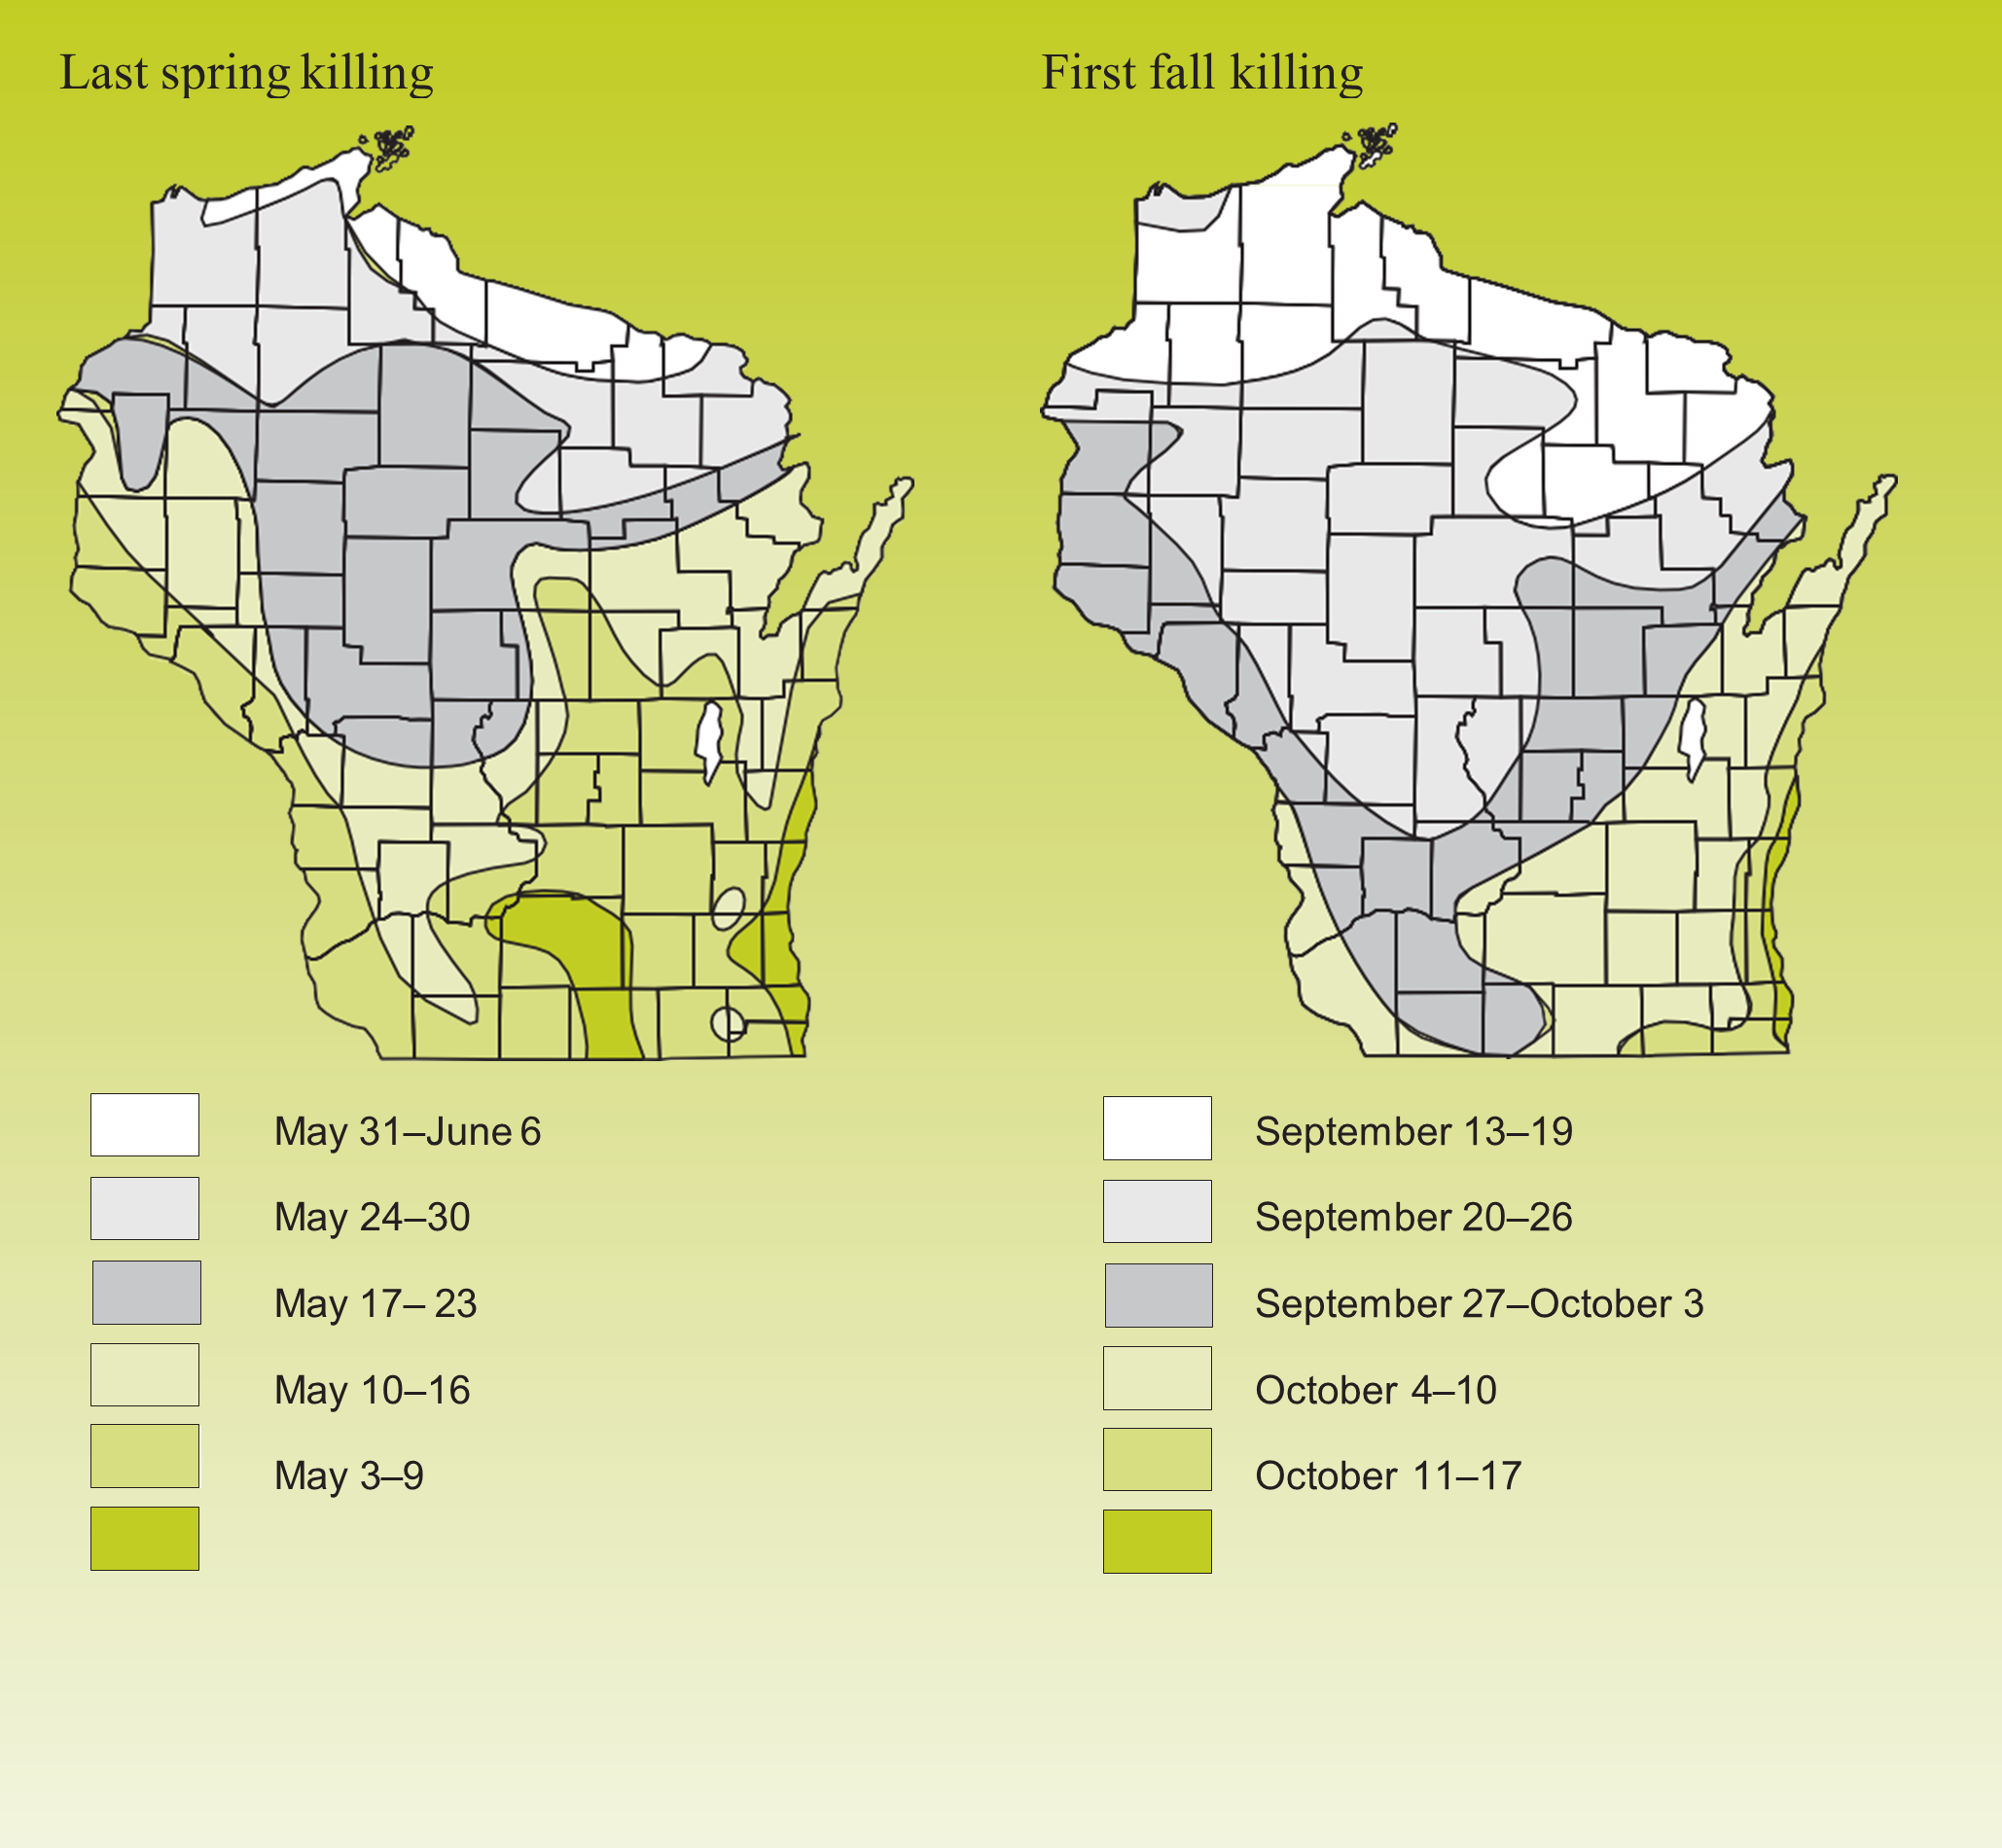
Table 2. Planting Guide
Lettuce Culture
Lettuce prefers temperature of 65–70°F during the day and 45–55°F at night. High light intensity and long days increase the growth rate and hasten leaf development. However, long days associated with high temperatures will cause lettuce to bolt. Lettuce, like most salad greens, can be planted out as early as April 15 in southern Wisconsin with successive plantings made every 2–3 weeks to assure a continuous crop as long as cool weather permits. Some heat-tolerant varieties of lettuce can be planted as late as early July. Under optimum conditions, lettuce seed will germinate in 2–4 days and emerge shortly thereafter. Cooler soil temperatures will slow the rate of germination, and germination stops at temperatures above 77–86°F (depending on cultivar). For head lettuce, plant three seeds every 8 inches in rows 12–18 inches apart and thin to one plant every 8 inches. For leaf lettuce, plant densely and thin to 1 inch between plants. Plant in rows 2–4 inches wide or in beds.
Decide whether you would like to combine seeds to mix cultivars within the planting beds or grow them separately to be mixed postharvest. An advantage to planting individual rows to only one cultivar is that if diseases or insects affect one type of lettuce, then you can more easily manage the problem than if they are all grown together.
Light is required for germination so lettuce seed is typically only lightly covered with soil after planting. Sprinkle lightly for even moisture.
Head lettuce may be started from seed indoors and transplanted out in early May to ensure adequate time for maturity before high temperatures cause plants to bolt. Transplants can be planted in a honeycomb fashion in the field whereby alternating rows of 3 plants and 2 plants equidistant from each other are planted in the bed to maximize the use of available space. Transplants should be watered well at the time of planting.
Spinach Culture
Spinach leaves grow best at 55–65°F. Under long days and warm temperature, spinach quickly bolts and stops producing large leaves. In the Midwest, spinach must be grown in the spring or fall when short days trigger leaf production instead of flowering. Plant spinach from mid-April through early May and again from early August through early September. At colder temperatures growth is slowed. Spinach is very hardy and if the plant is acclimated to cold it can withstand some freezing down to 14–20°F. Spinach seeds can be sown in late fall the year before and, depending on temperature, they will grow to maturity before frost or grow to a size (3–4 inches diameter) that will survive the winter and begin growing new leaves early the next spring. Spinach seeds can also be sown in late fall or early winter and covered in mulch to sprout early the next spring.
Similar to lettuce, spinach is direct seeded in rows or may be broadcast in beds. For salad mix, sow seeds 3⁄4 inch apart in rows 2–4 inches wide and thin to 1 inch between plants. Clip when small. For full-sized leaves, plant 11⁄4 inches apart in rows 12–18 inches apart and thin to one plant every 6–8 inches. Seed should be planted 1⁄2–3⁄4 inch deep. Unlike lettuce, spinach is slow to emerge and temperature affects the percentage of seeds that germinate. In temperatures of 40–45°F, almost all of the seeds will germinate, but they will take up to 3 weeks to emerge. In warmer temperatures, germination is faster (7–10 days) but fewer seeds will germinate.
Radicchio Culture
Plant radicchio by seed or from transplants in late May or early June, and seed a fall crop in mid-July. Plant three seeds 1⁄4-inch deep every 8 inches in rows 18 inches apart, and thin to one plant every 8–10 inches. Harvest small heads in 9–10 weeks. Some growers cut back plants in late summer and let them resprout, forming heads 4–6 weeks later.
Witloof Culture
Witloof, or Belgian endive, is direct seeded outdoors in late June in rows 18–24 inches apart. Plants should be thinned to 6–8 inches apart within the row. In the fall dig the roots and place them in cold storage. In early fall, when roots are 6–7 inches long and 1–2 inches wide at the crown, lift them from the ground and trim the tops to 2 inches. Smaller roots will not produce a tight bud of leaves, and larger roots will produce several buds that are too loose and small. Store the roots at 32–40°F to encourage dormancy and high relative humidity so they do not wilt.
Check your seed package for the length of time needed for cold storage, since cultivars vary from a few weeks to several months. After cold storage, place roots upright in boxes or pails of damp sand, compost, or peat and cover them 1 inch deep. Keep the boxes at 50–60°F and 95% humidity in the dark. In 30 days or so, buds form. Lower temperatures will produce tight, round buds more slowly, and higher temperatures will produce elongated looser buds more quickly. Cut the buds just above the soil line with a sharp knife when they are 4–6 inches long. Keep them in the dark until consumed, since light will turn leaves green and make them more bitter. Roots will resprout for a second and third harvest.
Endive and Escarole Culture
Cultural practices for curly endive and escarole are similar to those for lettuce, but they tolerate greater temperature extremes than lettuce. Both grow well in 60–75°F weather, and unless they are bred for day length adaptability, will tend to bolt under long summer days with hot temperatures. Also, hot weather tends to make leaves taste more bitter. Curly endive tolerates heat well and escarole tolerates cold. Blanching (preventing light from reaching the leaves) will reduce the bitterness of endive and escarole. Planting close together helps self-blanching cultivars keep out light. Plant 1⁄4-inch deep in spacings as you would lettuce, 8 inches apart for heads and 1 inch apart for salad mix. You can direct seed or start transplants indoors. To blanch interior leaves on a head, wait late enough in the day to dry the leaves and then tie the outermost leaves together for 2 weeks before harvest. Endive and escarole do best with constant soil moisture, which reduces tip burn on leaves.
Swiss Chard Culture
Chard can be planted as early as mid-April and planting can continue every four weeks or so until 30 days before frost for salad mix and 60 days before frost for full sized leaves. Cold temperatures can induce bolting which stops leaf growth and makes leaves bitter. Plant either directly in the field or use transplants. For salad mix, seed 1⁄2-inch deep and thin to 1 inch. For full-sized leaves, space plants 8–12 inches apart in the row.
Extending the Growing Season
You can lengthen the growing season by protecting plants from late spring frosts and early fall frosts. There are a variety of ways to prolong the growing season, including planting on a southern slope, creating a warmer microclimate using floating row covers, clear plastic tunnels, cold frames, or greenhouses made of plastic sheeting (“hoophouses” or “polyhouses”).
Floating Row Covers
Floating row covers of spunbonded polypropylene allow sunlight and water to pass through the fabric. They can be used to protect low-growing crops from frost, to serve as windbreaks, and to protect against insect pests. Depending on the fabric weight, row covers can provide 4–8°F of frost protection. Row covers allow you to plant salad greens 3–4 weeks earlier in the spring and extend the season 3–4 weeks later in the fall. They can be reused two to three seasons.
To use row covers, drape them over the crop or support them with wire hoops. Gather the edges in a loose accordion-type fold and loosely bury them in soil along the crop row. As the crop grows it will push up enough fabric to maintain a “floating” cover. With crops that will grow to market maturity under row covers, consider supporting the row cover fabric to prevent abrasion damage to plants. Use 9-guage wire hoops spaced 6 feet apart and buried 1 foot deep on each side of the row.
Row covers can be held in place by burying the edges with weights such as rebar. Completely seal all four edges to the ground if you use row covers as an insect barrier. If not using row covers as an insect barrier, remove row covers when the average daily temperature is warm enough for crop growth. Be sure to vent the beds on hot days and to let plants harden off for a few days to prevent burning before completely removing the row covers. Harden plants by removing covers on overcast days or for a few hours on sunny days.
Tunnels and cold frames
Tunnels are large, unheated plastic-covered hoops that can be used to extend the growing season. Slitted clear poly tunnels increase daytime temperatures by 10–30°F and provide 1–4°F of frost protection. Cold frames can be used to grow crops to maturity earlier in the spring and later in the fall than would normally be possible. Consult the references at the end of this publication for more information on cold frames and tunnels.
Hoophouse, polyhouse, or greenhouse production
Salad greens lend themselves well to season extension with greenhouses or plastic hoophouses. You can plant under shelter 4–6 weeks earlier than directly outdoors; some crops as early as February. Similarly, fall crops can be extended through November before natural light levels become too low and supplemental lighting becomes necessary. Floating row covers on top of crops grown under plastic can give additional insulation. Crops grown in these structures can be grown from transplants or direct seeded.
Preventing high nitrate levels
Since plants require light to metabolize nitrate, higher levels of nitrate can accumulate in salad greens grown under low light. Nitrate can convert to nitrite, which can be toxic to humans. When growing leafy crops indoors under low light, there are several practices you should follow to keep leaf nitrate levels down:
- Use minimal nitrogen fertilizer.
- Sidedress the fertilizer instead of broadcasting it.
- Apply several smaller doses of nitrogen throughout the growing season rather than one large dose.
Cultivars of salad greens differ in their accumulation of nitrate. Spinach is especially prone to accumulating nitrate.
Soils and Nutrient Management for growing Salad Greens
Obtain a soil test for available nutrients before planting a field for the first time and test routinely thereafter at least once every 3 years. After 3 years, soil conditions can change enough to make your current fertility management program obsolete. For information on how to collect good samples and where to send them for analysis, see Sampling Soils for Testing. Routine soil tests include pH, organic matter content, phosphorus, and potassium. Special tests are available on request for nitrate-nitrogen, calcium, magnesium, sulfur, boron, manganese, and zinc. You will receive the results of your soil test along with fertilizer recommendations based on your cropping history and planned use of the field. You can also test your potting mix and the soil you intend to use for indoor production of salad greens.
Soil pH
Soil pH varies between the various salad greens but generally should range between 6.0–8.0 for optimum nutrient availability and to prevent deficiency symptoms. For lettuce, 6.0–8.0 is optimal; for spinach, chicories, endive, and escarole, 6.0–7.5 is optimal; and for chard 6.5–7.5 is optimal. If the pH is below 6.0, apply aglime to raise the pH.
Fertilizer Needs
Plants take up nitrogen as nitrate (NO –) orammonium (NH4+), phosphorus as phosphate (P2O5), and potassium as potash (K2O). These chemicals, as fertilizers, can come from organic or inorganic sources. With adequate environmental conditions, soil microbes break down organic matter and supply the chemical nutrients that plants need to their roots. Organic fertilizers can also improve soil tilth and health. Inorganic fertilizers can be used to quickly supply nutrients to plants.
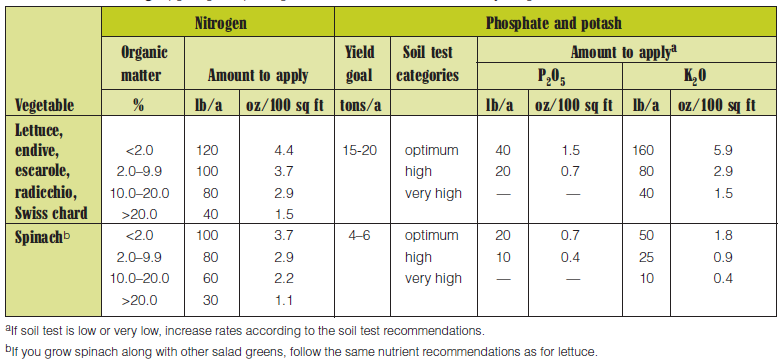
Organic fertilizers can come from a variety of sources such as manures, compost, fish meal, and bone meal. Each material contains varying amounts of specific nutrients. Table 3 provides fertilizer recommendations and table 4 lists organic fertilizers and the amounts of nutrients available in each. For more information on this subject, refer to Extension publication Organic Soil Conditioners (A2305).
Table 3. Annual nitrogen, phosphate, and potash recommendations for leafy crops
Nitrogen
Salad greens have a relatively shallow and small root system, so they cannot explore a wide area of soil for their nutrient needs. Also, rapid, continuous growth encourages crisp high-quality leaves. Frequent small applications of fertilizer are more effective than a few large applications. Adequate nitrogen is necessary for optimum growth of all salad greens. On mineral soils, broadcast no more than one half of the nitrogen during field preparation and band or sidedress the remainder later, such as at thinning. On muck soils, apply all of the recommended nitrogen after field preparation. Supplemental nitrogen may be needed throughout the season to meet the plant’s needs, since 75% of the plant biomass is accumulated in the last few weeks before harvest. A combined nitrate and ammonia-based nitrogen fertilizer will provide both rapid and sustained nitrogen release.
Micronutrients
Lettuce is prone to micronutrient deficiency when the levels of the essential nutrients are low. In particular, boron, copper, zinc, and molybdenum deficiencies may occur in lettuce grown on alkaline soils. Spinach is prone to many of the same micronutrient deficiencies including boron, copper, molybdenum and magnesium. Under droughty conditions, calcium may become deficient, causing tipburn on salad greens. This physiological disorder occurs when high temperature and low water uptake causes rapid growth and decreased transpiration, reducing calcium transport to the developing tissues.
Table 4. Nutrient composition of various organic fertilizers
| Material | N | P2O5 | K2O |
|---|---|---|---|
| Alfalfa hay | 2.0-3.0% | 0.2-0.6% | 2.0-3.2% |
| Bone meal | 0.2-1.0% | 12.0-14.0% | — |
| Compost* | 0.5-3.5% | 0.5-1.0% | 1.0-2.0% |
| Fish meal | 9.0-11.0% | 5.0-8.0% | 0.0-0.3% |
| Greensand | — | — | 7.0 |
| Manure, cow | 0.5-0.7% | 0.2-0.4% | 0.5-0.8% |
| Manure, sheep | 1.0-2.0% | 0.7-1.0% | 0.5-2.0% |
| Manure, poultry | 1.1-1.7% | 1.0-1.3% | 0.5-1.0% |
| Rock Phosphate | — | 20.0-30.0% | — |
| Soybean meal | 7.0% | 0.5% | 2.3% |
Irrigation
Because of the large leaf area, their high transpiration rate, and their small shallow root system, salad greens require regular irrigation, particularly on sandy soils. Irrigation is often helpful prior to germination to prevent a crust from forming on the soil. If leaves begin to wilt mid-day, plants are moisture stressed. Plants that wilt intermittently produce smaller yields than plants that are not allowed to wilt, while plants that wilt frequently or for too long will often die due to irreversible cell damage. Lettuce is particularly prone to wilting. Spinach is less demanding of supplemental irrigation, because it has a short lifespan which occurs during the cool part of the growing season.
Both drip and overhead sprinkler irrigation systems are effective. These systems include trickle tape, solid set, and traveler hose wheel. Drip irrigation systems will reduce the incidence of foliar diseases caused by excess leaf moisture.
Harvest, Handling, and Storage of Salad Greens
Almost all salad greens are hand harvested in the Midwest. Growers either pick the outer, older leaves from each plant or clip all the leaves at once. With both methods, new leaf growth occurs and several harvests are possible from each planting. The days from planting to harvest vary depending on the crop being grown and the weather conditions. Sample your own crop frequently to determine the best time to harvest under your conditions. You will be your own best sales representative if you learn to recognize and describe produce quality. Most leafy greens can be harvested from immature stages until they just begin to lose peak flavor. Some become bitter if harvested too late. Also, plants harvested late are more susceptible to postharvest diseases. Some growers sell “micro” greens: tiny leaves harvested when the first true leaves appear. Micro greens are used in salad, in place of sprouts, or as a garnish.
Harvest individual leaves by plucking them from the plant, bunches of leaves by cutting them with a sharp knife or shears, and lettuce and radicchio heads by cutting them with a sharp knife. Cut heads below the lowest leaf and remove any damaged leaves. Harvest salad greens into a container lined with a polypropylene mesh bag, such as a laundry bag. This will reduce handling time postharvest.
Salad greens retain their fresh crisp taste if they are hydrocooled and kept under high humidity. Hydrocool them by submerging the mesh bagfuls of crop in a cool water bath for several minutes immediately after harvest. If the leaves are gritty or dirty, change the water for a second or third rinse.
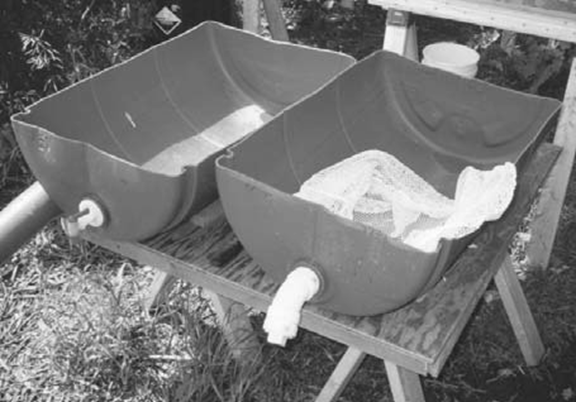
Buy or make washtubs large enough to fit your operation. You can use barrels made of food-grade plastic, which are available secondhand from dairy supply houses or food processing plants. Cut the barrels in half lengthwise and build a wooden framework to support them at a good working height (see picture). Cut a hole in the short end to insert a PVC elbow and valve (from the plumbing supply section of your hardware store) that you can fit into a long PVC pipe to drain the water away from your workstation.
Or choose a bigger tank to wash greens, such as a recycled stainless steel bulk milk tank from a dairy farm. Some growers have fitted motors from whirlpool baths into bulk milk tanks to create a bubble-type washing system for salad greens.
Dry greens by spinning them for a few minutes or laying them out on screen tables. You can spin dry a small amount of washed greens by swinging the mesh bag in circles over your head lasso-style. Larger quantities can be dried by placing two mesh bags of greens into a secondhand washing machine set to spin cycle for a few minutes. Some growers remove the center agitator from the machine. Other growers use large restaurant salad spinners powered by an electric motor.
Pack greens into waxed cardboard boxes and store them in a cooler. Maintain humidity and provide evaporative cooling by lining the box with a clean damp cloth. Make sure that temperatures do not fall below 32°F, since freezing can harm the crops. Ethylene, a gas given off by ripening apples, melons, pears, plums, and tomatoes will also reduce the quality of salad greens and cause them to yellow. Do not store these crops in the same cooler as salad greens. Sell greens bulk by the pound or in plastic produce bags as soon as possible after harvest. They can be kept in a cooler for 1–2 weeks.
Harvesting Lettuce
Lettuce should be harvested when plants reach a suitable size for the cultivar grown. For crisphead lettuce, the heads should yield slightly to pressure. Crisphead lettuce is ready to harvest approximately 60–120 days after planting, depending on weather conditions and cultivar grown. Butterhead lettuce is mature in 42–70 days, romaine in 50–70 days, and leaf lettuce in 48–58 days. All of the lettuce types except crisphead have excellent quality as an immature crop, and can be harvested starting approximately 3 weeks before full maturity. Butterhead and leaf lettuce have more tender leaves and more exposed leaf surfaces, so they are more perishable than crisphead or romaine lettuce. Lettuce should be stored at 33–35°F and 90–95% relative humidity.
Harvesting Spinach
Spinach matures in 35–50 days and can be harvested once five to seven leaves have formed. Continue harvesting until the new leaves produced become too small or a seed stalk forms. Typically an average of 25 leaves per plant can be expected. Spinach keeps well if stored at temperatures of 32°F and a relative humidity of 85–95%.
Harvesting Radicchio
Harvest radicchio when heads are the appropriate size for the cultivar grown, approximately 60–90 days after planting, and store for up to 2 weeks at 32°F and 95% relative humidity. Endive and escarole reach full maturity in approximately 52–90 days depending on cultivar and growing conditions. They can also be harvested as immature greens beginning 3 weeks earlier. Like radicchio, they should be kept at 32°F and 95% relative humidity and will keep for up to 2 weeks. Harvested witloof maintains freshness for only a few days. Store it in the dark at 32°F and 95% relative humidity.
Harvesting Swiss Chard
Swiss chard matures in 50–60 days but can also be harvested as immature leaves approximately 3 weeks before full maturity. Store chard at temperatures of 32°F and a relative humidity of 85–95%.
Tips for Harvesting and Packing Lettuce
Growing salad greens can involve a lot of stoop labor during thinning, weeding, and harvesting. Change your position often to minimize stress and fatigue to your body. Some growers sit on a one-legged field stool that straps on with a waist belt. Others sit on a cart that straddles the crop rows. Slow-moving tractors are available that straddle the crop row and allow workers to lie face down with their hands free to harvest. Some growers have fitted these machines with a handheld power band saw and vacuum system to cut and collect leafy greens.
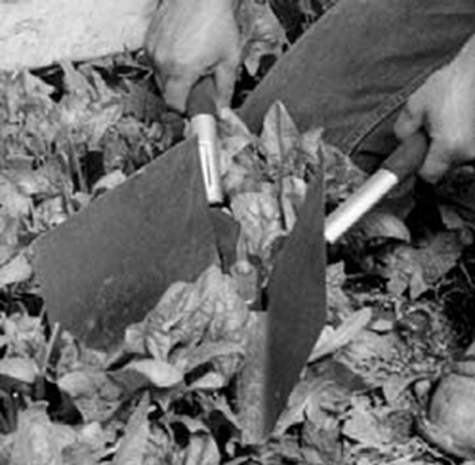
Other options include small-scale harvesters that are pulled behind a tractor and are either power take-off (PTO) driven or self-propelled. Some growers modify lightweight hedge shears to harvest salad greens by attaching a rectangular piece of thin sheet metal to the bottom of each blade and bending it up at a 90° angle to form a scoop (see picture). They use both hands to cut the greens and then tip the shears into a container to empty the greens.
Use garden carts and wagons as much as possible to minimize lifting and hand carrying heavy produce. Standardized vented plastic containers that stack are easy to load, unload, and clean.
With a smooth level floor in the packing area, a palletized packing and storage system can be designed to fit small-scale operations (small pallets moved with a hand-pushed pallet truck) or large operations (pallets moved by forklift). Heavy boxes of produce can be moved from one area to another on roller tables.
Lay out your washing and packing area to minimize stooping, lifting, and carrying. Set up work stations and water baths at table height. Ideally tables could be adjusted to match each worker, so that work is performed at a height between wrist and elbow when the arm hangs at the worker’s side.
Common Insect Pests of Salad Greens
Aphids
Aphids – Description: Aphids are small, soft-bodied, pear-shaped insects that come in a variety of colors. They can be distinguished from all other types of insects by the presence of cornicles, or tailpipes, projecting from the back end of the insect.
The bean, green peach, potato, and melon aphids commonly infest salad greens. All species can be winged or wingless and may reach 1⁄8 inch in length. Immature bean aphids are green and spotted with white wax while the adults are dark green or sooty black in color. The green peach aphid has an elongated, smooth, soft, spindle-shaped body. Antennae are held to the side and are longer than the body.
Coloration varies from green to reddish-pink. Winged forms are a pale green. Potato aphids have more slender bodies and longer legs and are more active. Melon aphids are 1⁄16 inch long and vary from pale yellow to dark green or black with black cornicles. All species have piercing/sucking mouthparts and feed by sucking on plant juices.
Aphids – Life cycle: In Wisconsin, bean aphids overwinter as eggs on euonymous and viburnum while green peach aphids overwinter on the bark of peach, plum, apricot, or cherry trees. Potato aphids overwinter as eggs on wild and cultivated roses and melon aphids survive the winter on a whole host of woody plants. During the summer, adult female aphids produce offspring without mating or laying eggs. In warm weather a female can give birth to as many as 12 nymphs per day.
Nymphs mature in less than 2 weeks. Late in the season, the females mate and produce eggs that will overwinter. Individual generations may be completed within 1 week during the summer, and multiple generations overlap. Aphids produce winged offspring when colonies become overcrowded and when day length begins to shorten. Colonies live primarily on the underside of leaves, usually in the lower canopy.
Aphids – Damage, symptoms: Aphids feed by inserting a fine, needle-like stylet between plant cells into the vascular tissue. Typically, this causes little direct injury to adjacent tissues. Extremely large populations may extract enough sap to cause leaf curling and wilting or eventual plant death. Seedlings are most susceptible to aphid damage, although salad greens of any size may be killed by heavy aphid feeding. Aphids excrete excess sap, called honeydew, which falls onto leaves, giving them a sticky texture. Sooty mold fungi may grow on honeydew secretions, making affected greens unmarketable. Aphids are capable of transmitting many viruses that affect lettuce and other salad greens.
Aphids – Management: Scout weekly for aphids by examining 30 plants per field up to 10 acres. Add 10 plants for each additional 10 acres. Examine the entire plant, paying close attention to the lower leaf surfaces. Count the number of adult and nymph aphids. Treat if you find more than 3 aphids on seedling plants or more than 10 aphids per plant on established plants. Monitor whether populations are increasing or decreasing over time.
Natural controls such as heavy rains, predators, and diseases may help reduce aphid populations.
Predators include ladybird beetles, lacewings, and syrphid flies. Often though, aphids reproduce far faster than the parasites and predators can consume them.
Systemic and foliar insecticides provide good control. However, insecticides often also destroy the beneficial natural enemies, resulting in secondary aphid problems. In addition, many populations of green peach aphids have high levels of insecticide resistance. Insecticides should be applied for other insects only when needed, as determined by scouting.
Aster Leafhopper
Aster Leafhopper – Description: The aster leafhopper is a serious pest of salad greens because it transmits the aster yellows phytoplasma. Adult aster leafhoppers are olive-green, wedge-shaped, and about 1/5 inch long. Adults have six spots on the back of the head. Nymphs are similar in shape to the adults, but are cream-colored and lack fully developed wings. Adults are extremely active and jump, crawl, or fly when disturbed. Nymphs are less active but crawl rapidly.
Aster Leafhopper – Life cycle: The first leafhoppers that appear each season migrate from the Gulf states. Each year they are carried on warm, southerly winds. Large influxes may occur in June and early July as local populations develop. Adult females lay eggs in the leaves of susceptible plants. Nymphs hatch 5–7 days later and mature in 20–30 days. There are normally two to five generations per year.
Aster Leafhopper – Damage, symptoms: Both nymphs and adults feed by inserting piercing-sucking mouthparts into the plant to extract sap. If a leafhopper feeds on an infected plant, it ingests the aster yellows pathogen. When the leafhopper moves to another plant to feed, it transmits the pathogen in its saliva. In lettuce, disease symptoms appear about one month later. Initial symptoms of aster yellows is a generalized chlorosis followed by a stunting and twisting of the leaves.
Aster Leafhopper – Management: Aster leafhoppers may be effectively controlled by excluding them from the planting using floating row covers. Row covers should be in place from the time the lettuce emerges or is transplanted until 30 days before harvest. (See the section on season extenders for more information on floating row covers.)
If you’re not using row covers, the only effective way to prevent the spread of aster yellows disease is through insecticidal control of aster leafhoppers. To control leafhoppers, you need to know both the size of the population and the percent of the population that’s infective. Place sticky cards in the field when the crop emerges. The cards should be just above the crop and a few rows in from the outer field edge. Begin scouting weekly when you find leafhoppers on the cards. Use a sweep net to take 25 sweeps per site, and sample two sites per acre. Each spring, the University of Wisconsin-Madison Extension collects samples of migrating leafhoppers and determines the percentage that are infective. For current information, contact your county Extension office. If the percent of infectivity is not known, use 2.5% for the following calculations. To decide whether treatment is necessary, multiply the number of leafhoppers per 100 sweeps by the percent infectivity of the migrant populations. Treat when an index of 25 is reached. Because it takes a month for the symptoms of aster yellows to develop, treatment may be discontinued 2–3 weeks before harvest.
Remove weeds from field edges as these may be a reservoir for the pathogen. Avoid planting susceptible crops near untreated crops or weeds that the leafhopper uses for refuge. If not using insecticides or row covers, consider planting an additional 30% to offset losses due to aster yellows.
Black Cutworm
Black Cutworm – Description: Cutworms are the larvae of nocturnal gray moths. They tend to feed at or just below the ground surface at night. Cutworms are active feeders on young foliage and stems and will cut off many young seedlings in an evening. The large (11⁄2–2 inches), fleshy larvae curl up into a tight C-shape when disturbed.
Black Cutworm – Life cycle: Few cutworms overwinter in Wisconsin. Beginning in late May, moths migrate into the state. Female moths lay hundreds of eggs either singly or in clusters. Most eggs are laid on low-growing, grassy vegetation or plant residue from the previous year’s crop. Once the eggs hatch, the young larvae feed above ground on the tips of plants. Larger larvae feed at or just below the soil surface at night or on cloudy days. During the day they hide in the soil or beneath foliage. There are three to four generations per year in Wisconsin, but the first generation is the most damaging because it coincides with seedling plants.
Black Cutworm – Damage, symptoms: One large larva may destroy several plants in one evening. The larvae often pull the stem of the severed plant into their subterranean burrows.
Black Cutworm – Management: Since female moths prefer to lay eggs in grassy areas, controlling grassy weeds lessens the possibility of problems. Avoid planting in low, wet areas or in areas where grassy plants or weeds existed the previous year. Insecticides may be used in areas where cutworms historically have been a problem. Fields should be scouted if feeding damage is observed. Scout for cutworms by looking for wilted plants or plants with severed stems. There is no established threshold for treatment of cutworms in lettuce but growers usually become concerned when more than 3% of the planting is affected.
Spinach Leafminer
Spinach Leafminer – Description: The spinach leafminer can cause spinach, chard, and occasionally other leafy greens to become unmarketable as a result of their feeding. The spinach leafminer is the larval stage of a small, gray fly with black bristles.
Spinach Leafminer – Life cycle: The adult flies lay one to five elongate, white eggs on the lower leaf surface of older leaves. The eggs hatch within 3–6 days and legless, yellow-white maggots burrow into the leaf and begin feeding between the upper and lower leaf surfaces. A single larva may mine more than one leaf during its 2-week life span at which time they will drop to the ground to pupate. There can be three or four generations a year. Damage is most severe in early plantings but is possible throughout the season.
Spinach Leafminer – Damage, symptoms: Initial feeding damage appears as slender, winding mines. As the maggots grow, the mines become joined together to produce large, light-colored blotches that are filled with excrement. Damaged leaves are unmarketable.
Spinach Leafminer – Management: Floating row covers can be used to exclude the flies from laying eggs on leafy greens. (See the section on season extenders for details about timing and placement of row covers.) The removal of weedy hosts such as lambsquarters can also reduce the number of flies in the area and deep spring plowing will destroy any overwintering pupae.
There are no thresholds for the spinach leafminer, but if eggs are found on more than 50% of seedling crops, treatment should be implemented. Thresholds on established crops will vary with the market and how much damage the customer will tolerate. Typically, if more than 5% of the leaves have mines, treatment is warranted. Note that pesticides will not control maggots once they burrow into the leaves, so timing is critical.
Conservation of Natural Enemies
Not all insects are pests. Beneficial insects prey on other insects, helping to keep populations in check. You can take advantage of this free natural resource by minimizing the use of broad-spectrum insecticides.
For more information about biological controls, see Biological Control of Insects and Mites: An Introduction to Beneficial Natural Enemies and Their Use in Pest Management.
Common Lettuce Diseases of Salad Greens
Aster Yellows
Aster Yellows – Hosts and severity: Aster yellows is a potentially serious disease of salad greens as well as many other vegetables and ornamental flowers. The disease is caused by a phytoplasma organism which is similar to a virus.
Aster Yellows – Disease cycle: The phytoplasma that causes aster yellows is transmitted by at least 17 species of leafhoppers. The pathogen overwinters in the bodies of adult leafhoppers or in perennial host plants such as weeds and ornamentals. Leafhopper nymphs and adults acquire the pathogen through feeding on infected plants. Once inside the leafhopper, the phytoplasma multiplies. An incubation period of at least 10 days must pass before the leafhopper can transmit the pathogen back to the plants. The insect may remain infective for at least 100 days. Plants first show symptoms 30 days after they become infected.
Aster Yellows – Symptoms: Symptoms of aster yellows first appear as a yellowing of the leaf tissue especially of the heart leaves of heading types of lettuce. Leaves may also be twisted and disfigured. Infected lettuce leaves have a bitter taste. Escarole also turns yellow, but the leaves do not become distorted. Endive becomes severely stunted and chlorotic.
Aster Yellows – Management: There is no cure for aster yellows, so control is aimed at disease prevention. Control leafhoppers or exclude them from susceptible crops using floating row covers. Also, remove weeds from field edges that may serve as a reservoir for the pathogen.
Cercospora leaf spot
Hosts and severity: Cercospora can be a serious disease of spinach and chard in wet years, causing death of the entire leaf that is affected.
Disease cycle: The fungus overwinters on infected plant debris and wild hosts such as Queen Anne’s lace. Spores produced on this debris are carried by wind or water to young leaves. The fungus enters the plant through pores in the leaf (stomata). Lesions appear after 3–5 days and new spores are produced soon thereafter.
Symptoms: Early symptoms appear as tiny, water-soaked spots that enlarge to form larger, irregular, brown spots surrounded by a purple border. As the spots enlarge, the centers become whitish grey.
Spores of the Cercospora fungus are produced in the center of these lesions. In time, the center tissue becomes dry and brittle and falls out. Older leaves are infected first and infection may be severe enough to kill the entire leaf.
Management: Fall plowing to hasten decomposition of infected debris coupled with a 2- to 3-year crop rotations will aid in the control of Cercospora leaf blight. Balanced fertility will also reduce crop susceptibility. Protectant fungicides may be necessary.
Mosaic viruses
Mosaic viruses – Hosts and severity: Lettuce mosaic virus (LMV) is one of the most damaging diseases of lettuce, spinach, escarole, and endive. The cucumber mosaic virus (CMV) infects both lettuce and spinach. In the case of the latter, the syndrome is referred to as spinach blight. At least 34 plant families serve as hosts to CMV while 12 plant families are susceptible to LMV.
Mosaic viruses – Disease cycle: LMV is primarily seedborne with up to 3–5% of the seed being infected. The virus can also overwinter in weeds. The green peach aphid carries the virus between hosts. Aphids, most commonly the green peach aphid, are also responsible for the spread of CMV. This disease can be acquired from weedy host plants by aphids and transmitted to susceptible hosts within minutes. Infection is favored by warm temperatures and symptoms progress rapidly at temperatures above 82°F.
Mosaic viruses – Symptoms: The symptoms of LMV differ depending on age of plant, variety, and time of infection. Seedborne infection produces plants with irregularly shaped leaves. Under cool, cloudy conditions, infected leaves on older plants become mottled. In some varieties, leaves turn brown.
Initial symptoms of CMV on spinach appear as a mottling of the younger leaves. As the disease develops, leaves become yellow and crinkled. The growth of seedling plants becomes stunted. In lettuce, leaves become stunted and mottled yellow.
Mosaic viruses – Management: Early spring spinach and lettuce crops often escape infection. Destruction of perennial weed hosts of the virus will reduce the chance of infection. Once plants become infected with either virus, there is no cure. Controlling the aphids that carry the disease is often a key for successful management.
Plant spinach, lettuce, endive, and escarole away from previous plantings of these crops, particularly if infection occurred the previous year. Also, avoid planting spinach and lettuce near cucurbits which are also a common host for CMV. The spinach cultivars Melody Hybrid, Tyee, and Bloomsdale Long-Standing are resistant to the cucumber mosaic virus. No lettuce cultivars are resistant to CMV, though research continues to explore this possibility. Lettuce cultivars Esmerelda, Nevada, Parris Island, Prizehead, and Sierra are all resistant to LMV.
Damping off
Damping off – Hosts and severity: Damping off is one of the first diseases to appear after seedlings emerge. All vegetable seedlings are susceptible. Two fungi are commonly associated with damping off of lettuce: Pythium spp. and Fusarium spp. The pathogens infect plant roots soon after germination. The tissue at or below the soil line becomes soft and can no longer support the plant, causing it to topple. As plants mature, the stems become more woody and resistant to infection. Damping off is often limited to low spots of the field. Heavy, wet soils tend to have more problems with this disease than lighter, well-drained soils. Excess nitrogen can increase the incidence of disease.
Damping off – Disease cycle: The fungi that cause damping off are soilborne and infect the roots of seedlings soon after germination. Pythium can live in the soil 2–3 years while Fusarium can survive in the soil for 5 years or more.
Damping off – Symptoms: The first sign of infection is the presence of small, firm, dark green spots. These spots later turn tan or brown and collapse. In wet weather, threadlike, white to cream-colored mycelium may cover the lesions.
Damping off – Management: To prevent outbreaks on transplants, use sterile, soilless potting mix. Direct-seeded plantings may be protected by treating the seed with a fungicide prior to planting. Planting high-quality seed when conditions are favorable for rapid germination and growth will reduce the chance of infection. Crop rotations out of salad greens for at least 4 years are recommended.
Downy mildew
Downy mildew – Hosts and severity: Downy mildew in spinach is often referred to as “blue mold” and is caused by the fungus Peronospora effusa. It is a serious disease wherever spinach is grown. Under favorable weather conditions, an entire crop may be lost in a matter of days.
Downy mildew – Disease cycle: The fungus overwinters in infected plant debris and in the soil. In the spring, these spores germinate. Like other water mold fungi, it requires free water to cause infection. When they come into contact with a susceptible plant, infection occurs.
Downy mildew – Symptoms: The initial symptoms appear as irregular, chlorotic lesions on the leaves. During cool, wet weather conditions, the fungus produces blue-gray fruiting structures on the upper and lower leaf surfaces giving the name “blue mold” to the disease. The spots continue to enlarge until they cover the entire leaf and the leaf becomes black and dies.
Downy mildew – Management: Growers should practice a 3-year crop rotation out of spinach to reduce the likelihood of infection. Planting in well-drained soils or raised beds is also recommended. Resistant cultivars such as Melody, Olympia, Space, and Tyee are recommended for planting in areas where downy mildew has been a problem.
Lettuce bottom rot
Lettuce bottom rot – Hosts and severity: Bottom rot is a destructive fungal disease of lettuce caused by Rhizoctonia solani. The lower leaves of heading lettuce cultivars that come into contact with the soil become infected and rot. A wide range of plants can serve as host to the Rhizoctonia fungus. All types of lettuce, escarole, and endive are susceptible.
Lettuce bottom rot – Disease cycle: The fungus that causes bottom rot overwinters as mycelium on infected plant debris or as sclerotia in the soil where it can survive indefinitely. The disease can be spread by any means that moves soil from one location to another. Warm, moist conditions favors infection. The fungus enters the plant through wounds or natural openings such as stomata. As the infection progresses, spores are produced on the host. These spores can be splashed or blown long distances to infect other plants.
Lettuce bottom rot – Symptoms: Symptoms of bottom rot usually don’t occur until lettuce has already headed and is nearly mature. Sunken, rust-colored lesions appear on the midrib of leaves that come in direct contact with soil. Often, the first symptom noticed is when the outer wrapper leaves begin to wilt. As the infection progresses, leaves decompose and the infection moves inward, eventually infecting the entire head. An amber fluid oozes out of infected leaves.
Lettuce bottom rot – Management: Plant on well-drained soils or in raised beds and space plants to assure adequate air circulation to promote drying of the foliage. Rotate out of susceptible crops for a minimum of 3 years. Protectant fungicides may be necessary when weather conditions favor disease.
Sclerotinia drop
Sclerotinia drop – Hosts and severity: The fungus that causes Sclerotinia drop, Sclerotinia sclerotiorum, affects a wide range of succulent plants. It occurs in all lettuce-growing regions where cool, moist conditions exist.
Sclerotinia drop – Disease cycle: The fungus overwinters on live hosts, on infected plant debris, or as sclerotia in the soil. In the spring, the sclerotia germinate and produce a structure in which numerous spores are produced. These spores are spread to susceptible hosts by wind. Sclerotia germinating near lettuce plants can infect nearby plants directly.
Sclerotinia drop – Symptoms: The disease gets its name from the way the leaves of heading forms of lettuce “drop” in late stages of infection. Initial symptoms appear as a water-soaked lesion on the stem near the soil surface. From this point, the disease spreads downward to infect the root system and upward where a petiole rot causes leaves to wilt and die. The older, bottom leaves are affected first but the disease continues to spread until it reaches the interior of the head. Under wet conditions, the fungus produces a white mat of mycelium.
Sclerotinia drop – Management: Plant lettuce on light, well-drained soils or in raised beds. Space plants adequately far apart to promote rapid drying of the foliage during wet weather. Long rotations with resistant crops such as corn, grasses, or small grains should be practiced to prevent a build-up of inoculum in the soil and subsequent outbreaks of disease. Good weed control is also important to limit infection of alternate hosts. Chopping plants before incorporating the debris into the soil in the fall will hasten decomposition and reduce the potential of the pathogen overwintering
Weed Management for Salad Greens
Weed management is essential for crops to produce maximum yields. Weeds compete with crop plants for sunlight, water, nutrients, and space. It is essential to eliminate perennial weeds before planting. Do this by smothering with a cover crop (such as buckwheat), by heating the soil with black plastic, by hand removal, or by using herbicide sprays. Cultivate or hoe regularly to control annual weeds. Cultivating early in the season reduces weed impact the most. Pre-emergent herbicides may be used to clean up any annual weeds present in the field at the time of planting.
Salad greens are poor competitors with weeds because of their small shallow root system, and the relatively small leaf canopy they produce as compared with beans, tomatoes, or vine crops.
Weeds get in the way of harvest and easily contaminate the finished product. Shallow cultivation will help reduce root damage to the crop. Sometimes hand cultivation or hand weeding is necessary. The laydown tractors described in the harvest section are also useful to carry workers comfortably for hand weeding.
Refer to Commercial Vegetable Production in Wisconsin for specific herbicide recommendations.
Authors: K.A. Delahaut, A.C. Newenhouse
Published: October 2011
Item number: A3788
References
Culture
- 2003 High Tunnel Production Manual. Bill Lamont. 2003. University Park, PA: The Pennsylvania State University Center for Plasticulture.
- Direct Marketing of Farm Produce and Home Goods—Direct Marketing Alternatives and Strategies for Beginning and Established Producers (A3602). John Cottingham, James Hovland, et al. 1994. University of Wisconsin-Extension.
- Gardening Under Plastic: How to Use Fleece, Films, Cloches, and Polytunnels. Bernard Salt. 2003. London: Batsford Gardening Books.
- Growing for Market Newsletter. Fairplain Publications, P.O. Box 3747, Lawrence, Kansas 66046. www.growingformarket.com. A monthly newsletter with practical articles on all aspects of small-scale fresh market farming.
- Harvesting Vegetables from the Home Garden (A2727). H.C. Harrison. 1996. University of Wisconsin-Extension.
- The Hoophouse Handbook: Growing Produce and Flowers in Hoophouses and High Tunnels. 2003. Fairplain Publications, P.O. Box 3747, Lawrence, Kansas 66046.
- Knotts Handbook for Vegetable Growers, Fourth Edition. Donald N. Maynard and George J. Hochmuth. 1997. Wiley.
- The New Organic Grower. Second Edition. Eliot Coleman. 1995. Chelsea Green Publishing.
- The New Seed Starters Handbook. Nancy Bubel. 1988. Rodale Press.
- Soil Test Recommendations for Field, Vegetable, and Fruit Crops (A2809). K.A. Kelling, L.G. Bundy, S.M. Combs, and J.B. Peters. 1998. University of Wisconsin-Extension.
- Storing Vegetables at Home (A1135). H.C. Harrison. 1996. University of Wisconsin-Extension.
- Sustainable Vegetable Production From Start-up to Market. Vernon P. Grubinger. 1999. Natural Resource, Agriculture, and Engineering Service Cooperative Extension.
- Rodale’s All New Encyclopedia of Organic Gardening. Edited by Fern Marshall Bradley and Barbara W. Ellis. 1992. Rodale Press.
- Vegetables of Canada. Derek B. Munro and Ernest Small. 1997. National Research Council of Canada.
- Work Efficiency Tip Sheets. Healthy Farmers, Healthy Profits Project. University of Wisconsin-Madison. www.bse.wisc.edu/hfhp/. Work efficiency tools for small-scale vegetable farmers.
- World Vegetables: Principles, Production, and Nutritive Values. Second Edition. Vincent E. Rubatzky and Mas Yamaguchi. 1997. Chapman and Hall.
Pests
- Biological Control of Insects and mites: An introduction to Beneficial Natural Enemies and Their Use in Pest Management (NCR481). Daniel L. Mahr and Nino M. Ridgway. 1993. University of Wisconsin-Extension.
- Commercial Vegetable Production in Wisconsin (A3422). C.M. Boerboom et al. Updated annually. University of Wisconsin-Extension.
- Identifying Diseases of Vegetables. A.A. Macnab, A.F. Sherf, and J.K. Springer. 1983. Pennsylvania State University College of Agricultural Sciences.
- Pests of the Garden and Small Farm: A Grower’s Guide to Using Less Pesticide. Mary Louise Flint. 1998. University of California Press.
- Rodale’s Color Handbook of Garden Insects. Anna Carr. 1979. Rodale Press.
- Vegetable Insect Management with Emphasis on the Midwest. Rick Foster and Brian Flood, editors. 1995. Meister Publishing Company.
- Weeds of the North Central States. North Central Regional Research Publication No. 281. 1981. University of Illinois at Urbana-Champaign, College of Agriculture.