Overview of Dividing Bearded Iris
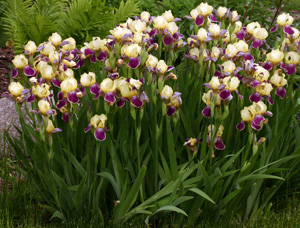
Bearded iris make great additions to gardens with their beautiful flowers in spring and their bold, vertical foliage. When flowering declines, centers of plantings thin out, or clumps of rhizomes look crowded on the soil surface, bearded iris need to be divided. This may occur in as little as two years or as many as five, perhaps longer. Regular division keeps plants flowering profusely and helps manage problems with iris borer and bacterial soft rot.
Bearded iris can be divided any time after flowering; this is often done in July or August in Wisconsin so the replanted portions have plenty of time to develop new roots and become established before freezing weather arrives.
How to Divide Bearded Iris
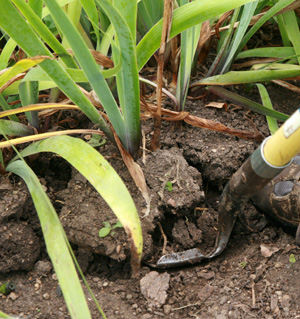
Lift clumps of iris carefully using a shovel or pitchfork. If soils are dry, water the bed thoroughly a day or so beforehand to make digging easier. The heavy, but shallow-rooted rhizomes are generally easy to see, making it fairly easy to avoid injuring the rhizomes when digging. If possible, lift the entire clump as a whole rather than breaking it up. Shake off the loose soil from the clumps. If your garden soil is fairly loose, you should be able to get most of the soil off the roots, but you can rinse off any remaining soil with a garden hose if necessary. This is also a good time to remove perennial weeds, such as quackgrass (Elymus repens), that may be present.
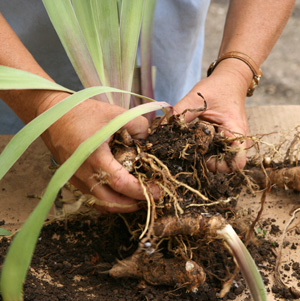
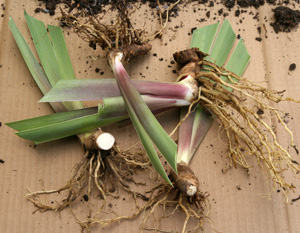
Separate individual rhizomes by pulling apart tangled sections. Inspect the rhizomes carefully for signs of iris borer damage and soft spots from disease. If the plants had dark streaks on the leaves, then the rhizomes likely are infested with borers. The female borer moth lays its eggs on the leaves in the fall, young caterpillars tunnel down the leaves to get to the rhizomes, leaving tell-tale streaks behind on the leaves. The plump, pink mature caterpillars generally leave the rhizomes in August to pupate in the soil. Extract and kill any borers you find and use a clean sharp knife or pruning shears to cut out any damaged parts of the rhizomes. Disinfect the cutting tools between cuts to prevent the spread of disease. Also eliminate any older, spongy growth.
Remove any damaged leaves, then cut the remaining leaves back to 4-6 inches long or to 1/3 their original height. This not only makes it easier to work with the plant but also helps reduce transpiration while the plant is becoming re-established. Leaves are often cut symmetrically on an angle but there is no real requirement to cut them in a certain way.
Use a clean knife or pruning shears to cut the rhizomes apart. Make the cuts at natural divisions in the rhizomes, such as where they fork. Make sure each piece is firm and light colored, at least 3″ long, with healthy roots, and a fan of leaves. Trim any broken or torn roots (scissors work well for this). If in doubt on the health of any rhizome piece, it is usually best to discard it.

Replanting Bearded Iris
Bearded iris should be grown in a sunny location with good drainage. If replanting in the same location, remove any debris and incorporate compost first. Space the divisions 12-18″ apart; if planted closer together dividing will be required sooner. Iris are often placed in groups of three divisions arranged in a triangle, with each fan of leaves pointing away from the other irises in the group.
To plant each rhizome, prepare a shallow hole with a low mound in the center. Place rhizomes horizontally on the mound, spreading their roots down the mound into the surrounding trench. The plant will grow from the end which has the fan of leaves, so point the rhizome accordingly in the direction you want it to grow. Then fill in the hole, leaving the top of the rhizome exposed or just barely cover it with a thin layer of soil. Do not bury rhizomes deeply in soil or cover them with mulch.
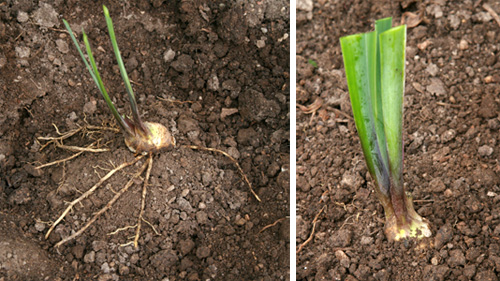
Bearded iris may not bloom and may be more susceptible to root rot if buried too deeply. Tamp down the soil and water thoroughly after planting. Keep the soil moist but not wet until leaf growth begins. Mulch newly planted iris after the ground freezes to prevent damage to the rhizomes from alternate freezing and thawing if snow cover is lacking. Remove the mulch in early spring.
Transplanted iris typically bloom sparsely the first season after replanting.
– Susan Mahr, University of Wisconsin – Madison
Last Update: Bruce Spangenberg, UW-Madison Extension, 2025